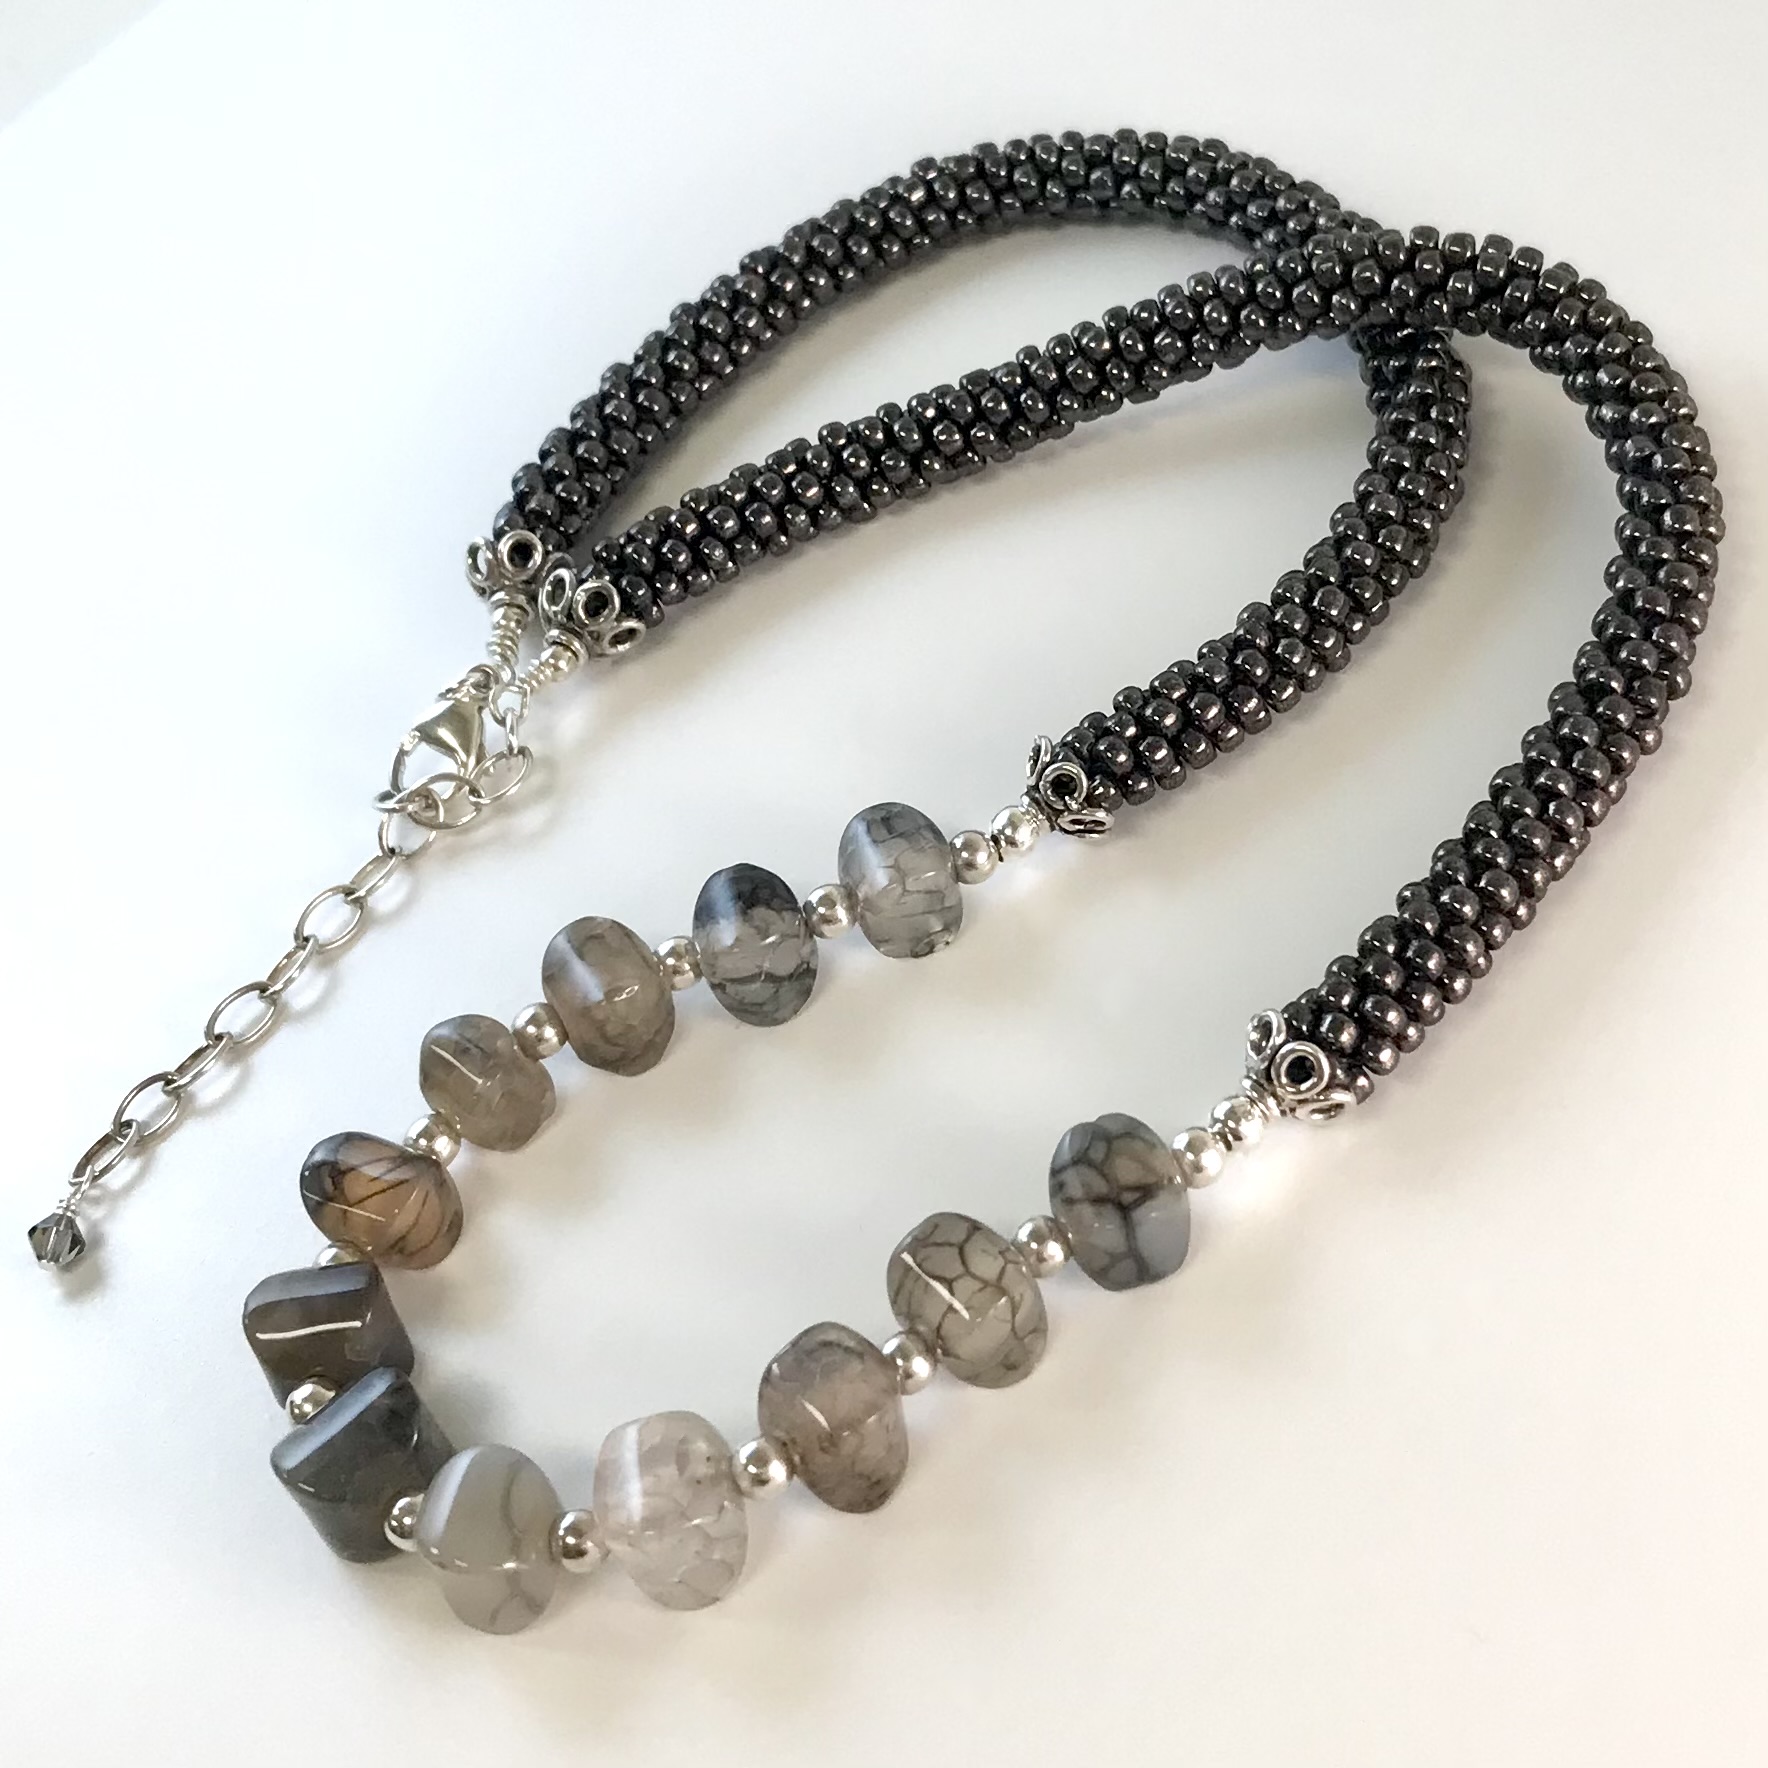
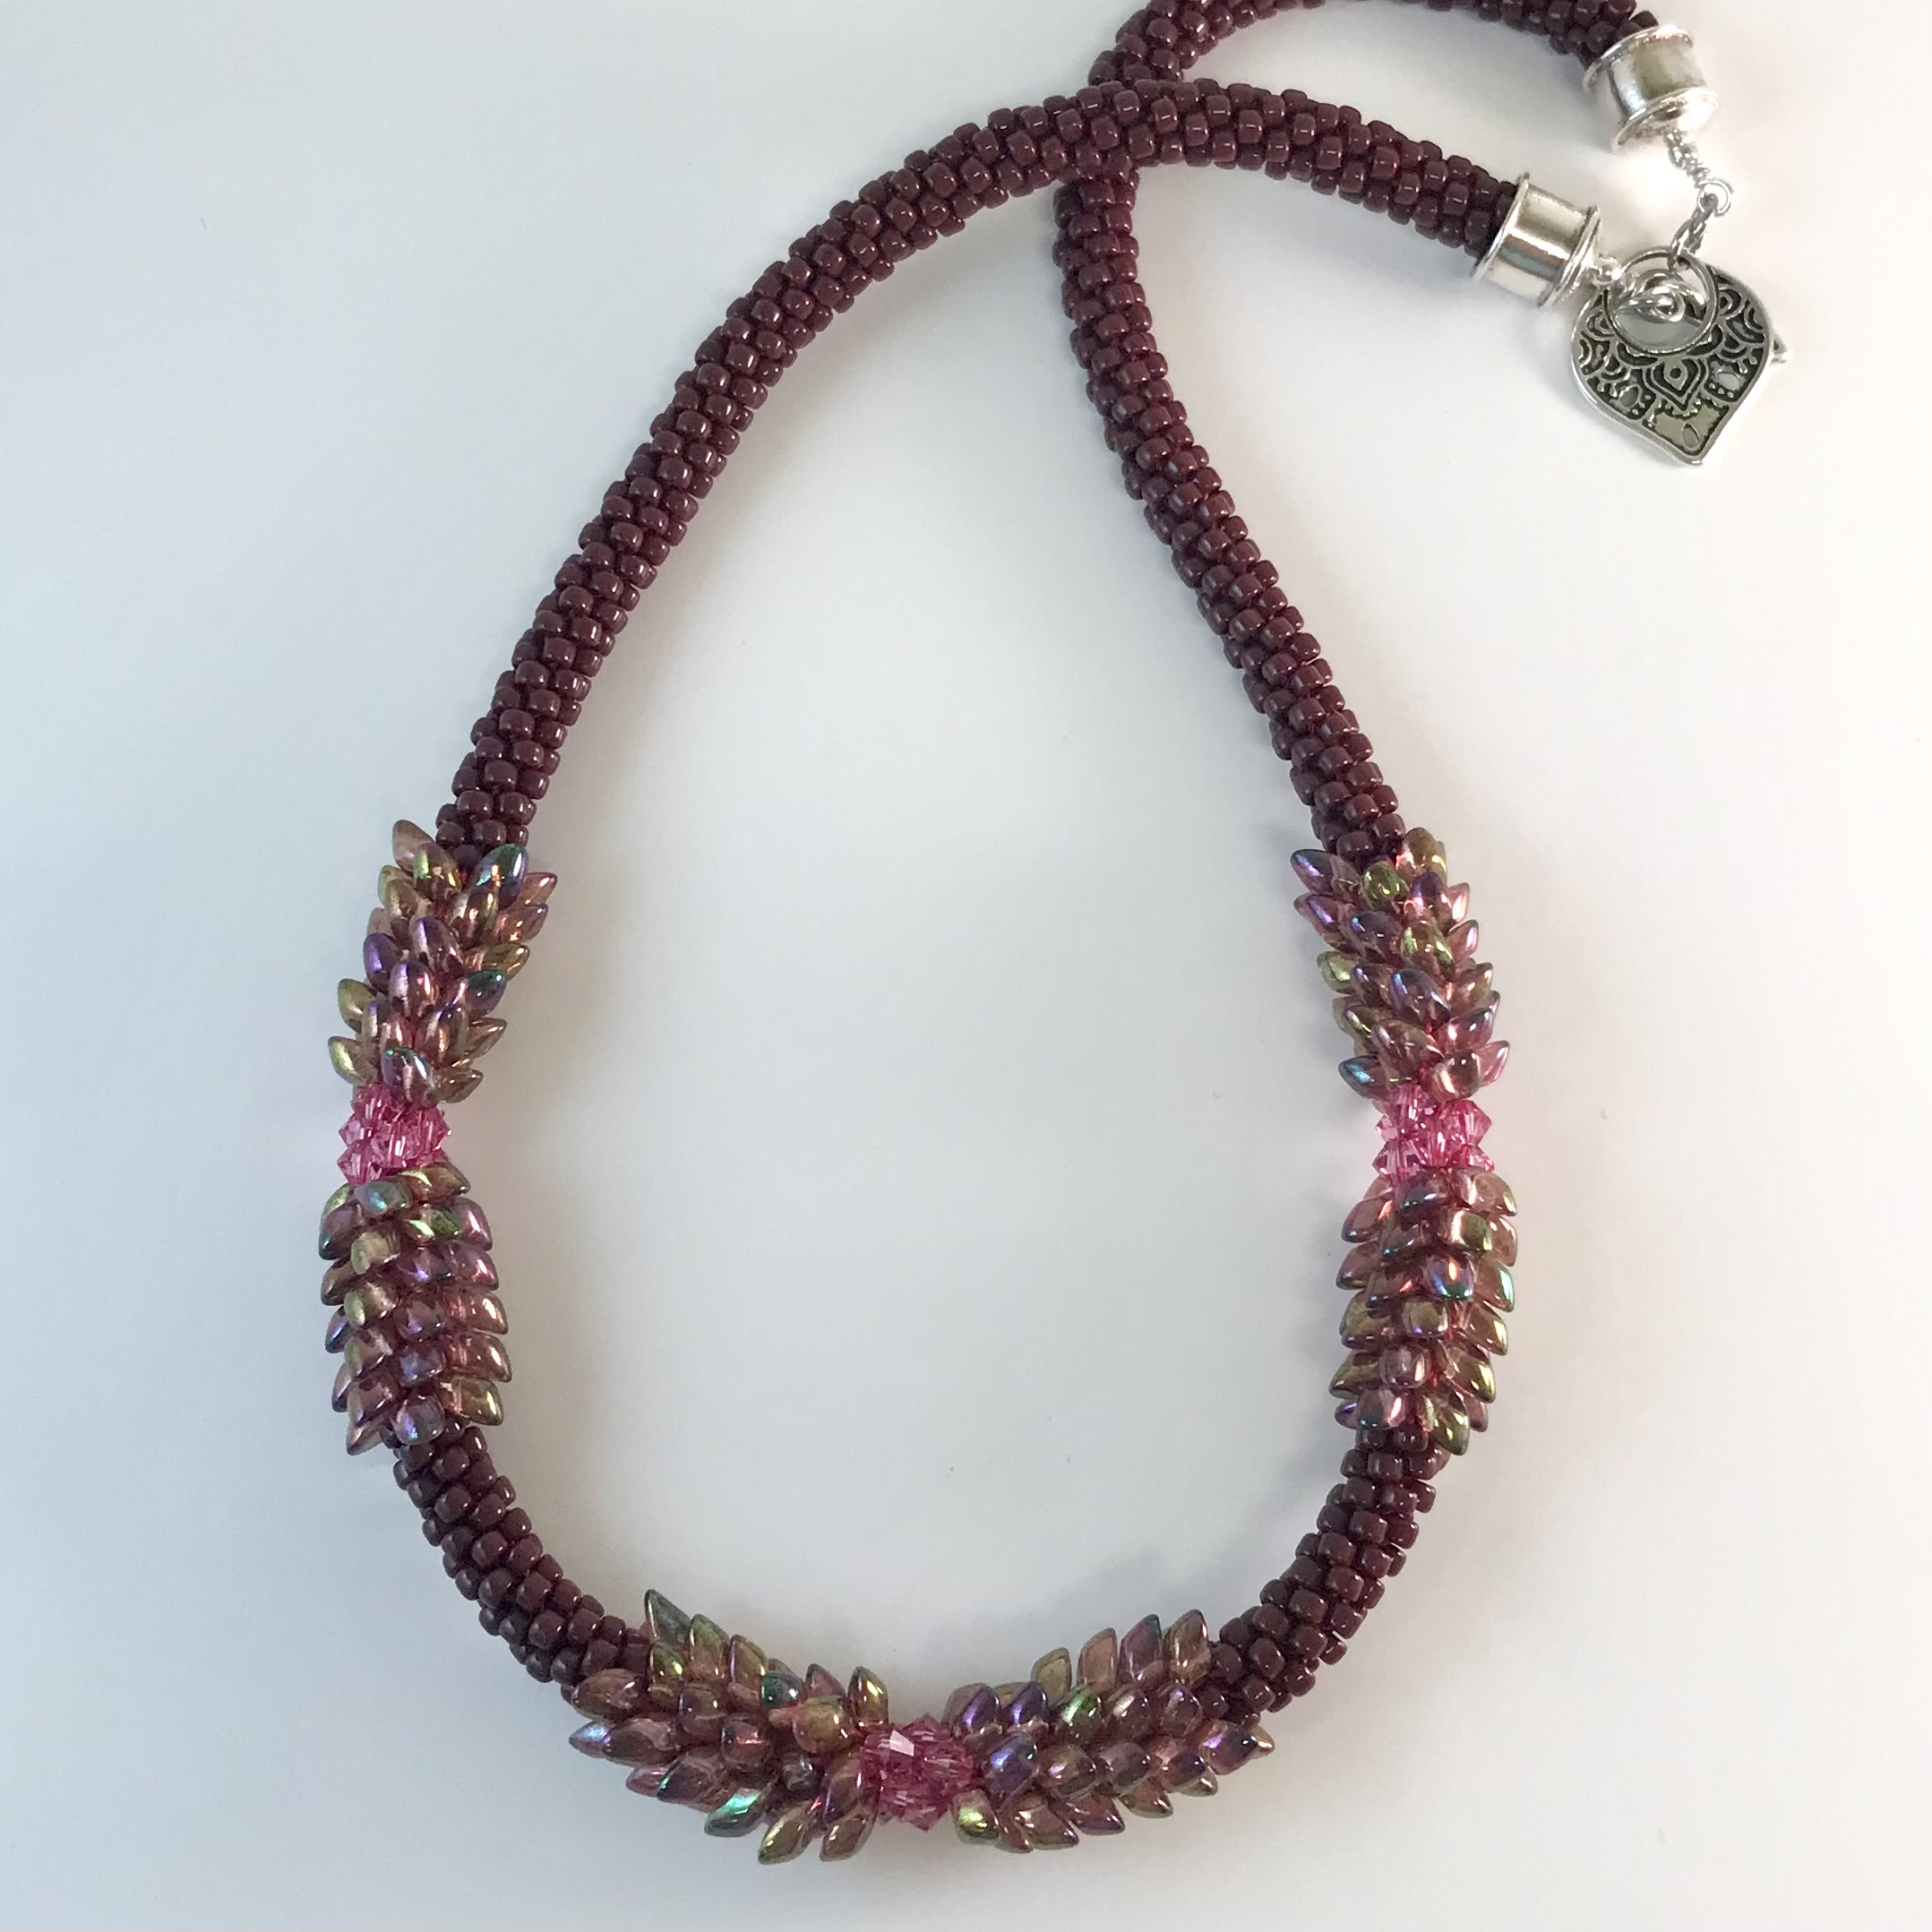
Now that you have learned how to do beaded kumihimo, it’s now time to learn how to add a focal section of gemstone beads to your necklace. This class will use skills learned in basic stringing classes and previous beaded kumihimo classes to make a one of a kind necklace!
This is an advanced class. You must know how to make a wrapped loop, use crimps and covers, and know how to set up and braid beaded kumihimo and finish the ends.
Note: All materials and tools for classes must be purchased at Beadoholique Bead Shop. This allows us to continue providing you with quality classes.
Tools Needed: Kumihimo disc 8 kumihimo bobbins 1 weighted kumihimo bobbin Bead stoppers Beading awl Thread cutters Big eye needle 4-in-1 Crimping pliers Mighty crimpers Flush cutters Chain nose pliers Round nose pliers Bead board or mat Magnifiers/readers are highly recommended for a successful class experience (even if you wear contacts or glasses)!
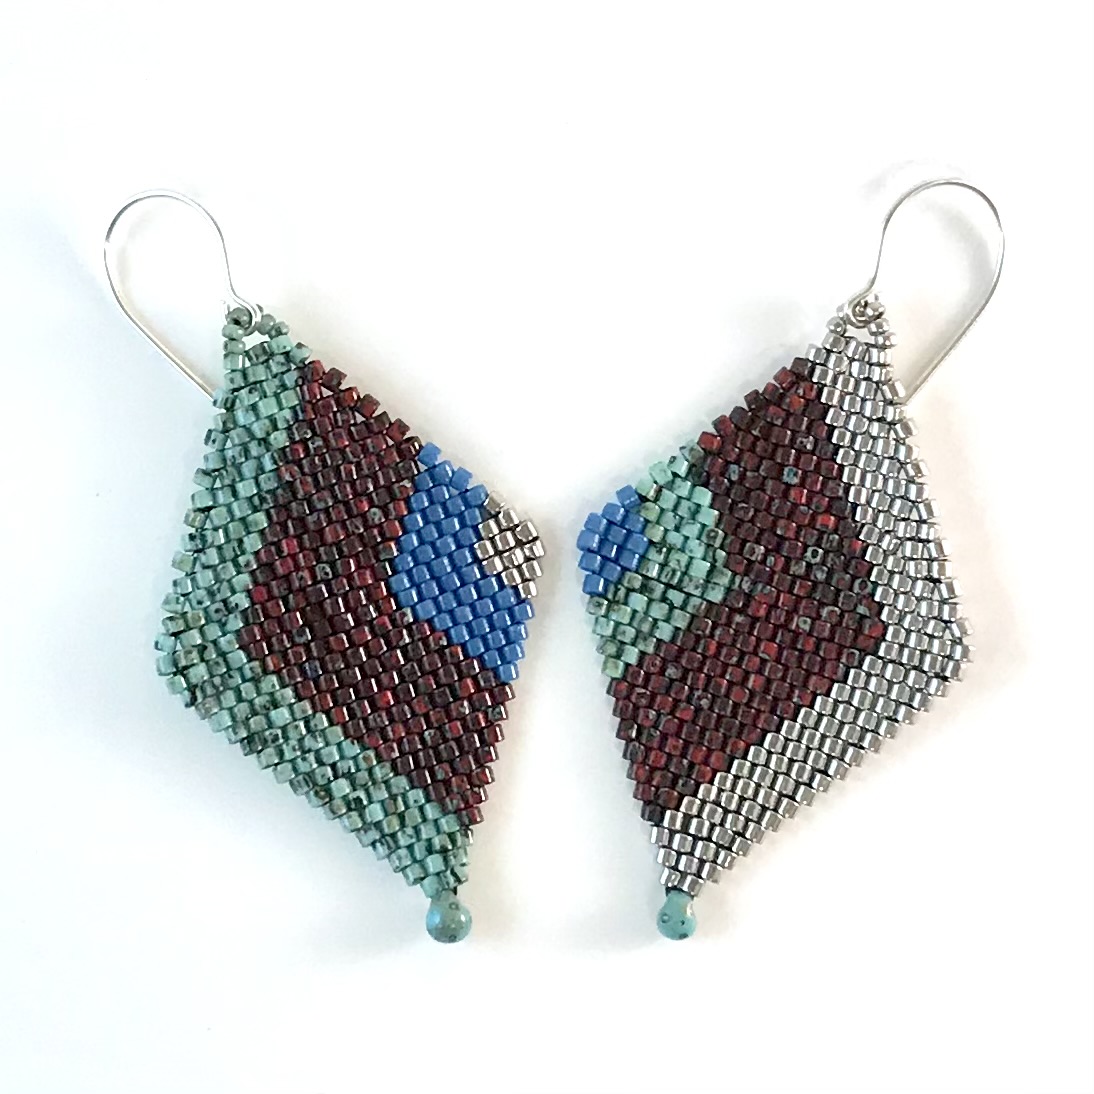
Combining stitches is not only fun but can give your project more texture and interest. These earrings combine peyote, which is an all-time favorite stitch for many, and brick stitch. You can use brick stitch to automatically taper a design, just like we will with these earrings! Bands of color make these very interesting.
Note: All materials and tools for classes must be purchased at Beadoholique Bead Shop. This allows us to continue providing you with quality classes.
Tools Needed: Size 12 beading needle Needle Puller (optional) Beading awl Fiber cutters/beading scissors Lighter or Thread burner Bead board or mat Magnifiers/readers are highly recommended for a successful class experience (even if you wear contacts or glasses)!
Techniques Used: Peyote, Brick Stitch
Skill Level: Advanced Beginner
Prerequisite: Knowledge of Peyote and Brick Stitch helpful, but not required
Instructor: Lisa
Three ways to sign up: Click here Send me an email Give me a call at 832-674-9005
Please Read:
1. Classes will begin on time! All students must arrive early for class. Even if you have already purchased supplies for the class, it takes time for everyone to set up and settle in. Students arriving late will need to re-schedule. Please be respectful of others by arriving early for class.
2. All beads, materials, and tools are available for purchase at the bead shop. We appreciate you purchasing materials and tools at the bead shop so that we may continue offering you the best classes around.
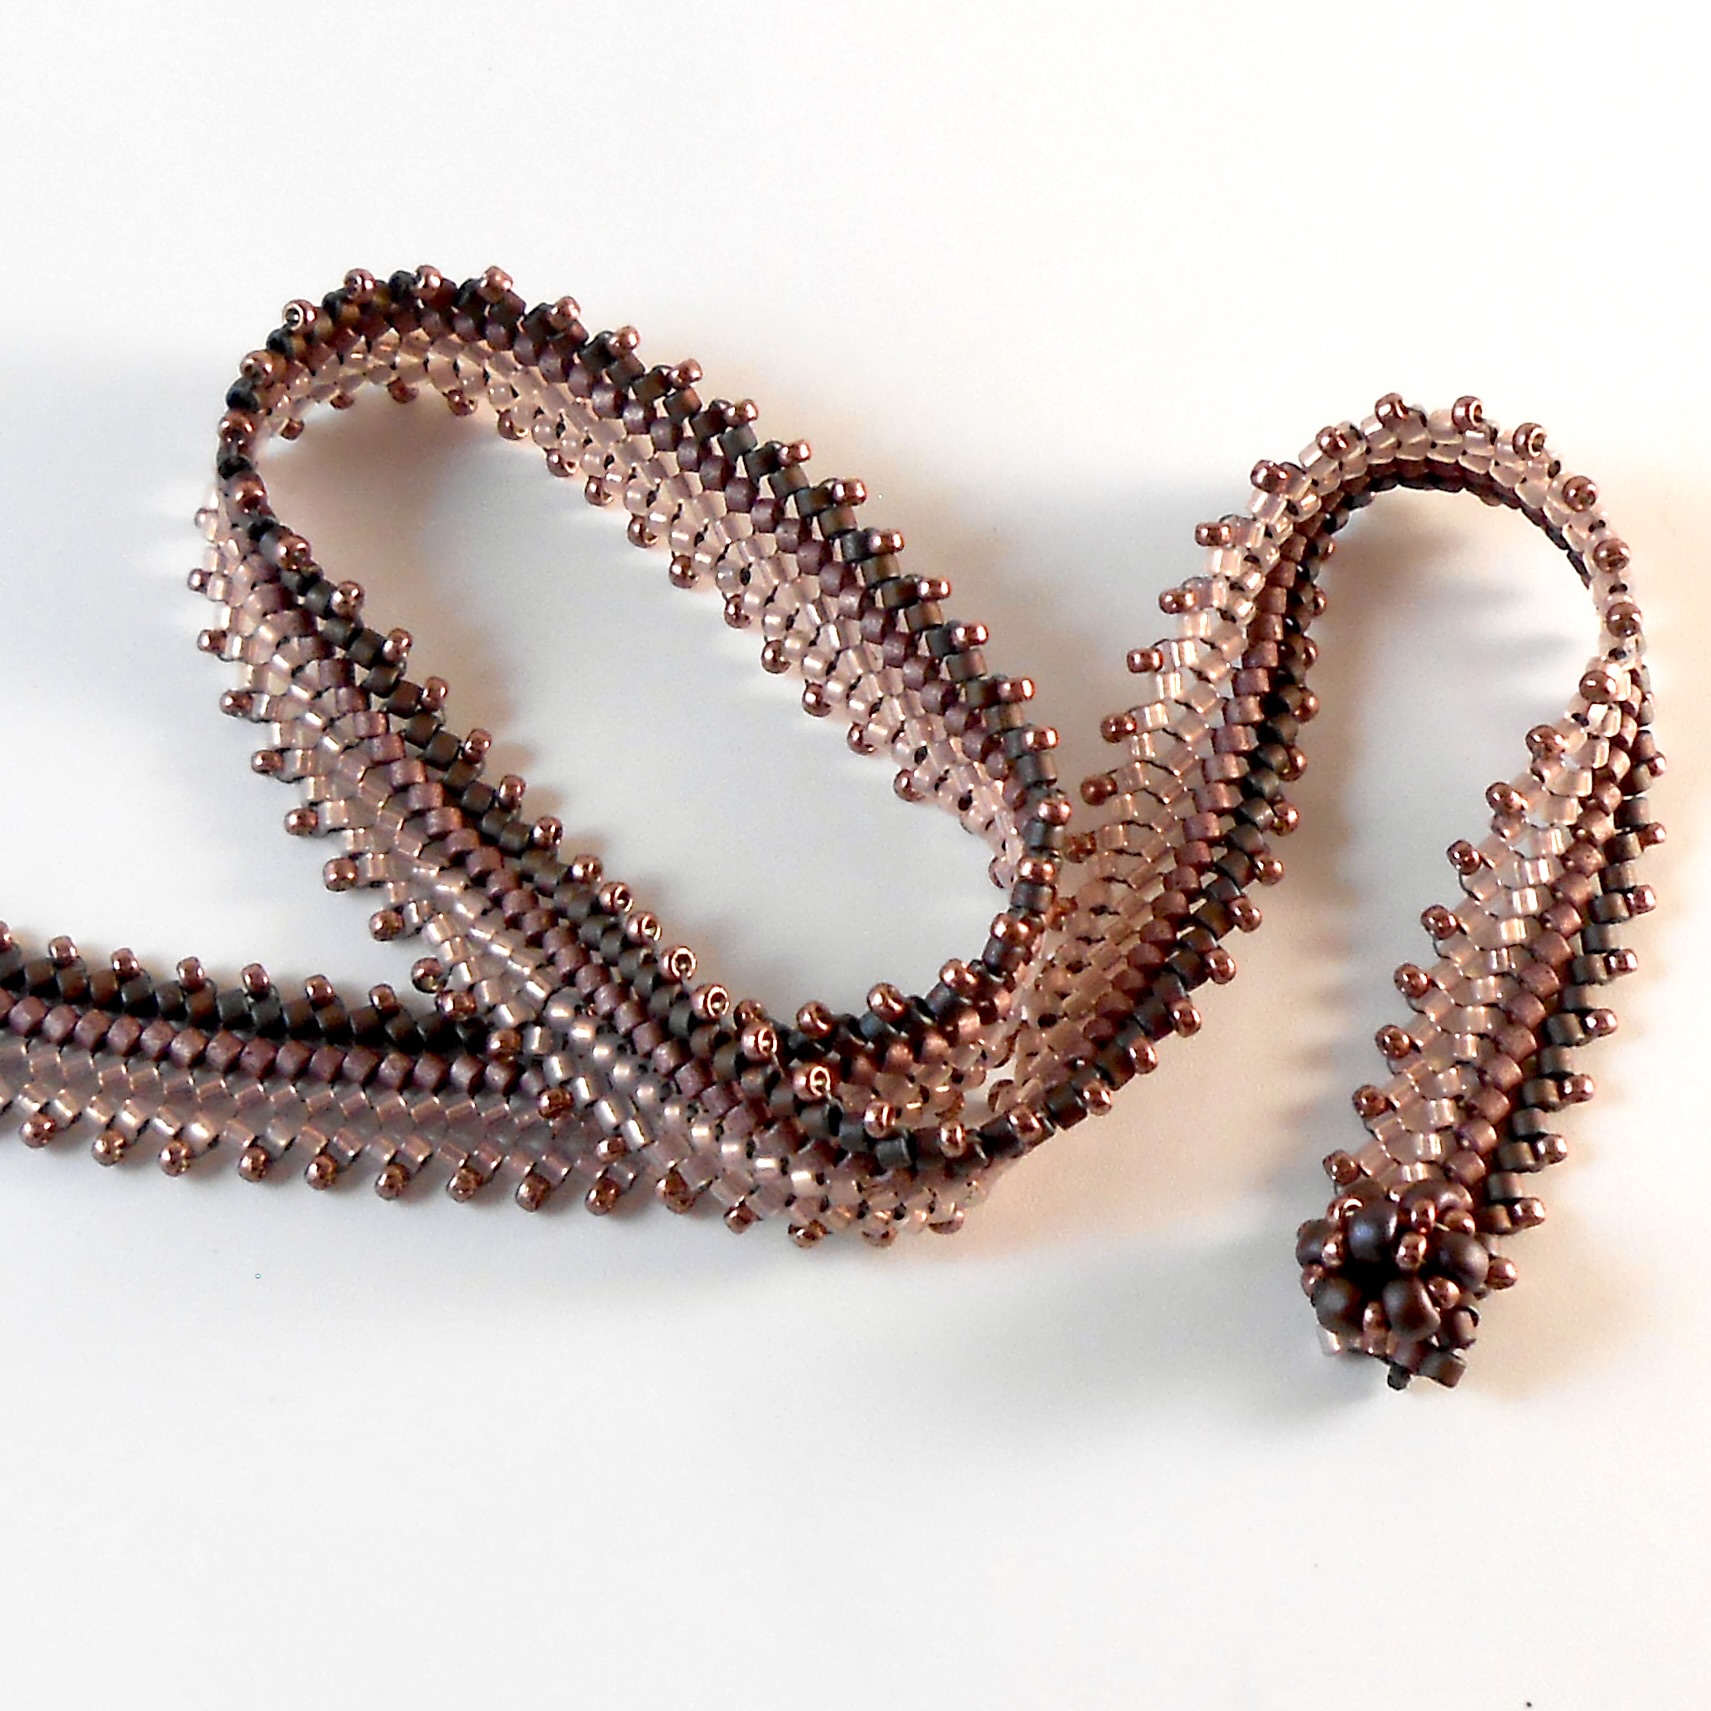
Ndebele is such an easy stitch and it’s so pretty. The stitch looks very dainty and is lightweight on your wrist. In this class you will make a sweet little single wrap bracelet that’s a mere two rows across and add a picot edging so it has a finished look. Add any type of clasp that you like and you’re all set!
Note: All materials and tools for classes must be purchased at Beadoholique Bead Shop. This allows us to continue providing you with quality classes.
Tools Needed: Size 11 or 12 beading needles Beading awl Thread cutters Lighter or Thread burner Bead board or mat Magnifiers/readers are highly recommended for a successful class experience (even if you wear contacts or glasses)!
Techniques Used: Ndebele, picot edge
Skill Level: Beginner
Prerequisite: None
Instructor: Lisa
Three ways to sign up: Click here Send me an email Give me a call at 832-674-9005
Please Read:
1. Classes will begin on time! All students must arrive early for class. Even if you have already purchased supplies for the class, it takes time for everyone to set up and settle in. Students arriving late will need to re-schedule. Please be respectful of others by arriving early for class.
2. All beads, materials, and tools are available for purchase at the bead shop. We appreciate you purchasing materials and tools at the bead shop so that we may continue offering you the best classes around.
In this class you will make a hollow bead from silver metal clay, used in conjunction with a paper/wood clay product. Paper clay provides support for any size bead for which slumping during firing may be a concern. During firing, the product burns out from the bead’s core, leaving the bead hollow.
You will apply prior skills with slabs to wrap a 3-dimensional form, and for adding decoration from more slabs rolled for cut-out decorative shapes. Syringe clay makes another appearance for other potential embellishments and for reinforcing the bead’s holes.
Molds can be used in addition, or exclusively, to create decorative embellishments.
A variety of small bead forms will be provided in order that they will be completely dry for the class. If you wish to make your own, please contact the instructor.
Please Read: The class fee shown above does not include the metal clay. You will be charged for the metal clay the day of the class. All materials and tools for classes must be purchased at Beadoholique Bead Shop. This allows us to continue providing you with quality classes.
Suppliesl and Tools Needed: Art Clay 950 Syringe clay Dried paper clay form (1) Silver clay slip Holding tools: for propping bead when wet -Toothpicks and other types of picks -Third hand (optional, but makes a good stand) -A wood or other block with holes in it, etc. Tools for working the clay: Hole punches for bead hole size you want (2mm+) Rolling frames and roller Work surface Teflon sheets CoolSlip or Slik Medium and small brush Water container Ruler Slab cutting tools (picks, Xacto) Smoothers for surfaces (clay shaper, other brushes, etc.) Clay hydrator(s) Cup warmer and screen Molds for making decorations, optional Texture plates (small patterned) for slab cutouts used for decoration, optional For finishing after firing: Soft beads brush Liver of sulfur Baking soda Polishing supplies Bring anything else you think you may need. Magnifiers/readers are highly recommended for a successful class experience (even if you wear contacts or glasses)!
Techniques Used: Silver Clay, Hollow forms
Skill Level: Intermediate to Advanced
Prerequisite: Previous metal clay classes
Instructor: Shauna
Three ways to sign up: Click here Send me an email Give me a call at 832-674-9005
Please Read:
1. Classes will begin on time! All students must arrive early for class. Even if you have already purchased supplies for the class, it takes time for everyone to set up and settle in. Students arriving late will need to re-schedule. Please be respectful of others by arriving early for class.
2. All beads, materials, and tools are available for purchase at the bead shop. We appreciate you purchasing materials and tools at the bead shop so that we may continue offering you the best classes around.
In this class, you will learn how to use directionally strung beads and different sized and shaped beads to create texture in your kumihimo ropes. Knowledge of basic 8 strand beaded kumihimo is required for this class.
Note: All materials and tools for classes must be purchased at Beadoholique Bead Shop. This allows us to continue providing you with quality classes.
Materials Needed: 12 yards of Tex135 S-Lon cord (118yd spool) 30gm of 7x4mm magatama beads Size 8 seed beads (1 color) 24 count of 4mm crystal bicones or fire polished beads 22ga headpins 4mm jump rings Clasp GS Hypo Cement
Tools Needed: Kumihimo disc 8 count Kumihimo bobbins (small) Kumihimo weight (40-45 grams) Round and Chain nose pliers Big eye needle Beading awl Tape measure Flush cutters Sharpie Fiber cutters Bead board or mat Magnifiers/readers are highly recommended for a successful class experience (even if you wear contacts or glasses)!
Techniques Used: Kumihimo
Skill Level: Intermediate
Prerequisite: Must have experience setting up a Kumihimo disc and trading with beads. Assumes knowledge of setting up disc for an 8-strand piece.
Instructor: Cindy
Three ways to sign up: Click here Send me an email Give me a call at 832-674-9005
Please Read:
1. Classes will begin on time! All students must arrive early for class. Even if you have already purchased supplies for the class, it takes time for everyone to set up and settle in. Students arriving late will need to re-schedule. Please be respectful of others by arriving early for class.
2. All beads, materials, and tools are available for purchase at the bead shop. We appreciate you purchasing materials and tools at the bead shop so that we may continue offering you the best classes around.
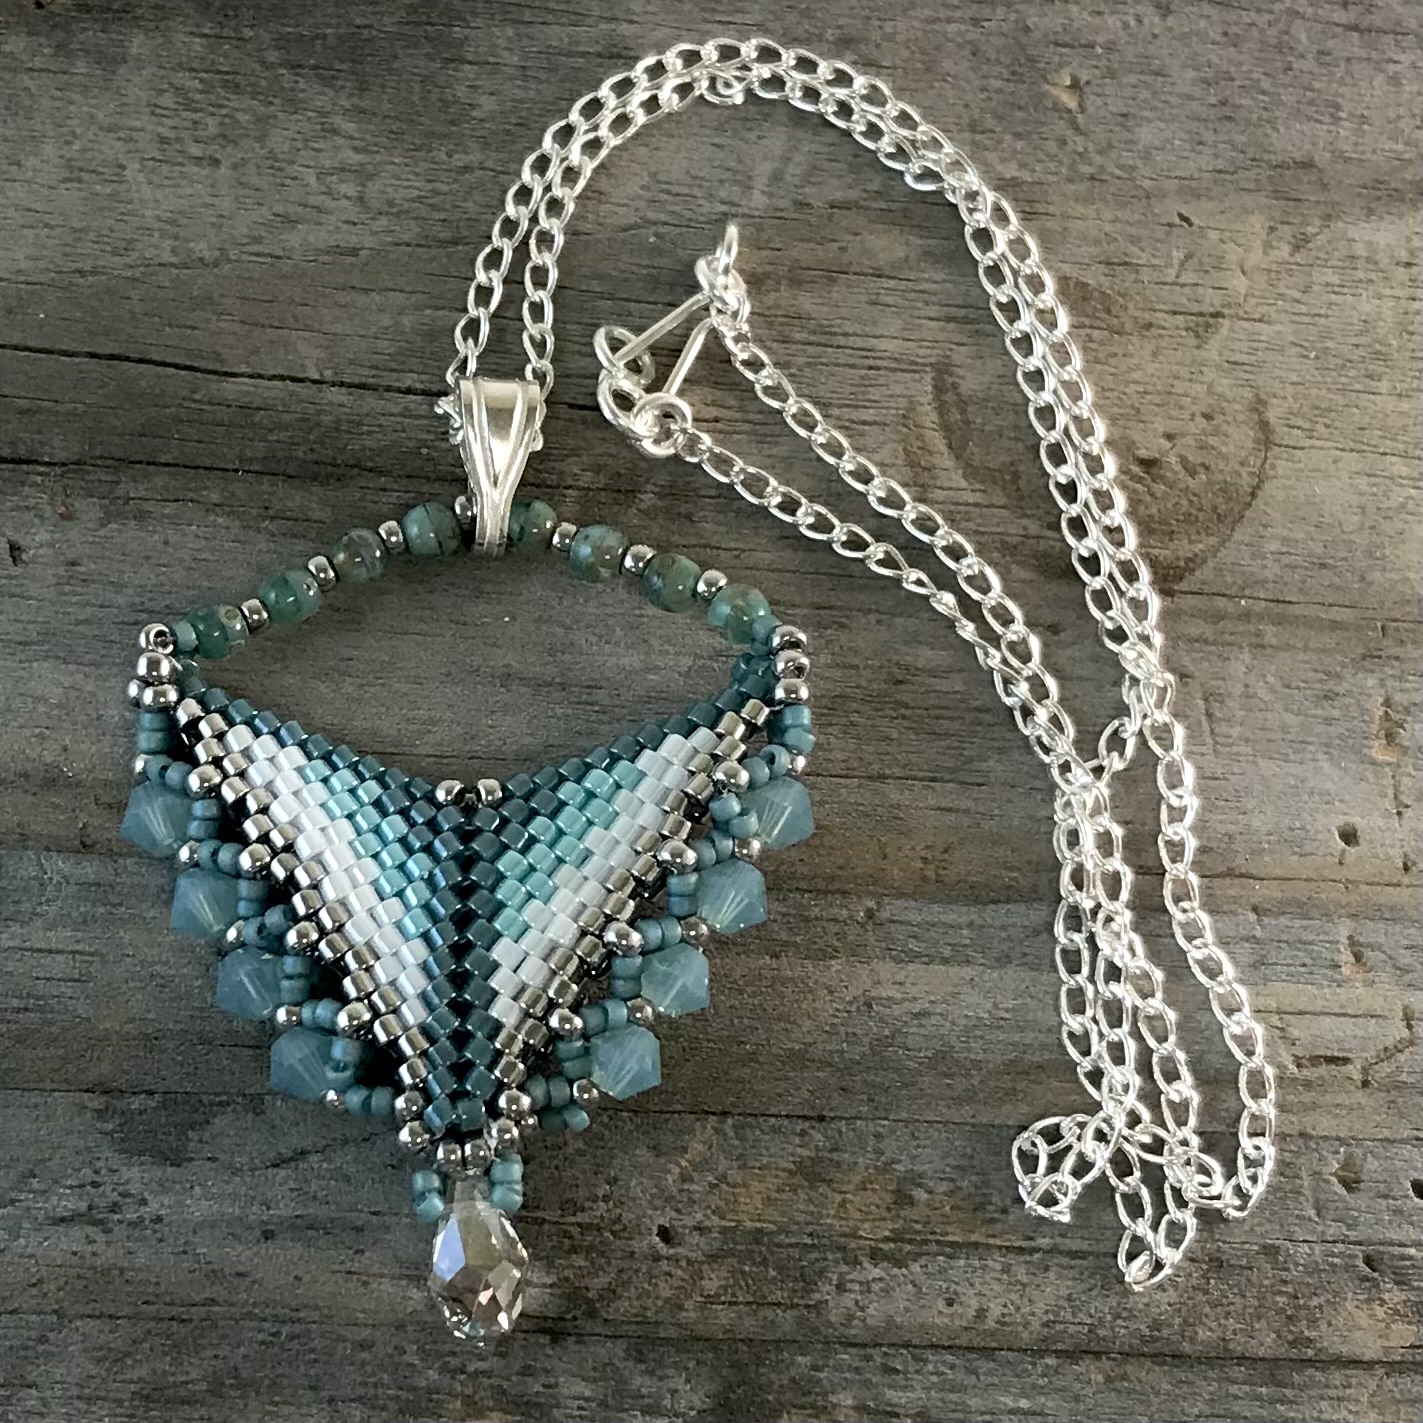
Join me for some peyote and Ndebele fun! In this class you learn to combine two stitches – peyote with an Ndebele spine, to form a triangular pendant that is embellished on the sides with crystals and seed beads. Please note that you will not be taught how to do peyote or ndebele – you must be familiar with both stitches for this class.
Note: All materials and tools for classes must be purchased at Beadoholique Bead Shop. This allows us to continue providing you with quality classes.
Tools Needed: Size 11 or 12 beading needles Beading awl Thread cutters Bead board or mat Magnifiers/readers are highly recommended for a successful class experience (even if you wear contacts or glasses)!
Techniques Used: Peyote, Ndebele
Skill Level: Intermediate
Prerequisite: Knowledge of peyote and ndebele stitches
Instructor: Lisa
Three ways to sign up: Click here Send me an email Give me a call at 832-674-9005
Please Read:
1. Classes will begin on time! All students must arrive early for class. Even if you have already purchased supplies for the class, it takes time for everyone to set up and settle in. Students arriving late will need to re-schedule. Please be respectful of others by arriving early for class.
2. All beads, materials, and tools are available for purchase at the bead shop. We appreciate you purchasing materials and tools at the bead shop so that we may continue offering you the best classes around.
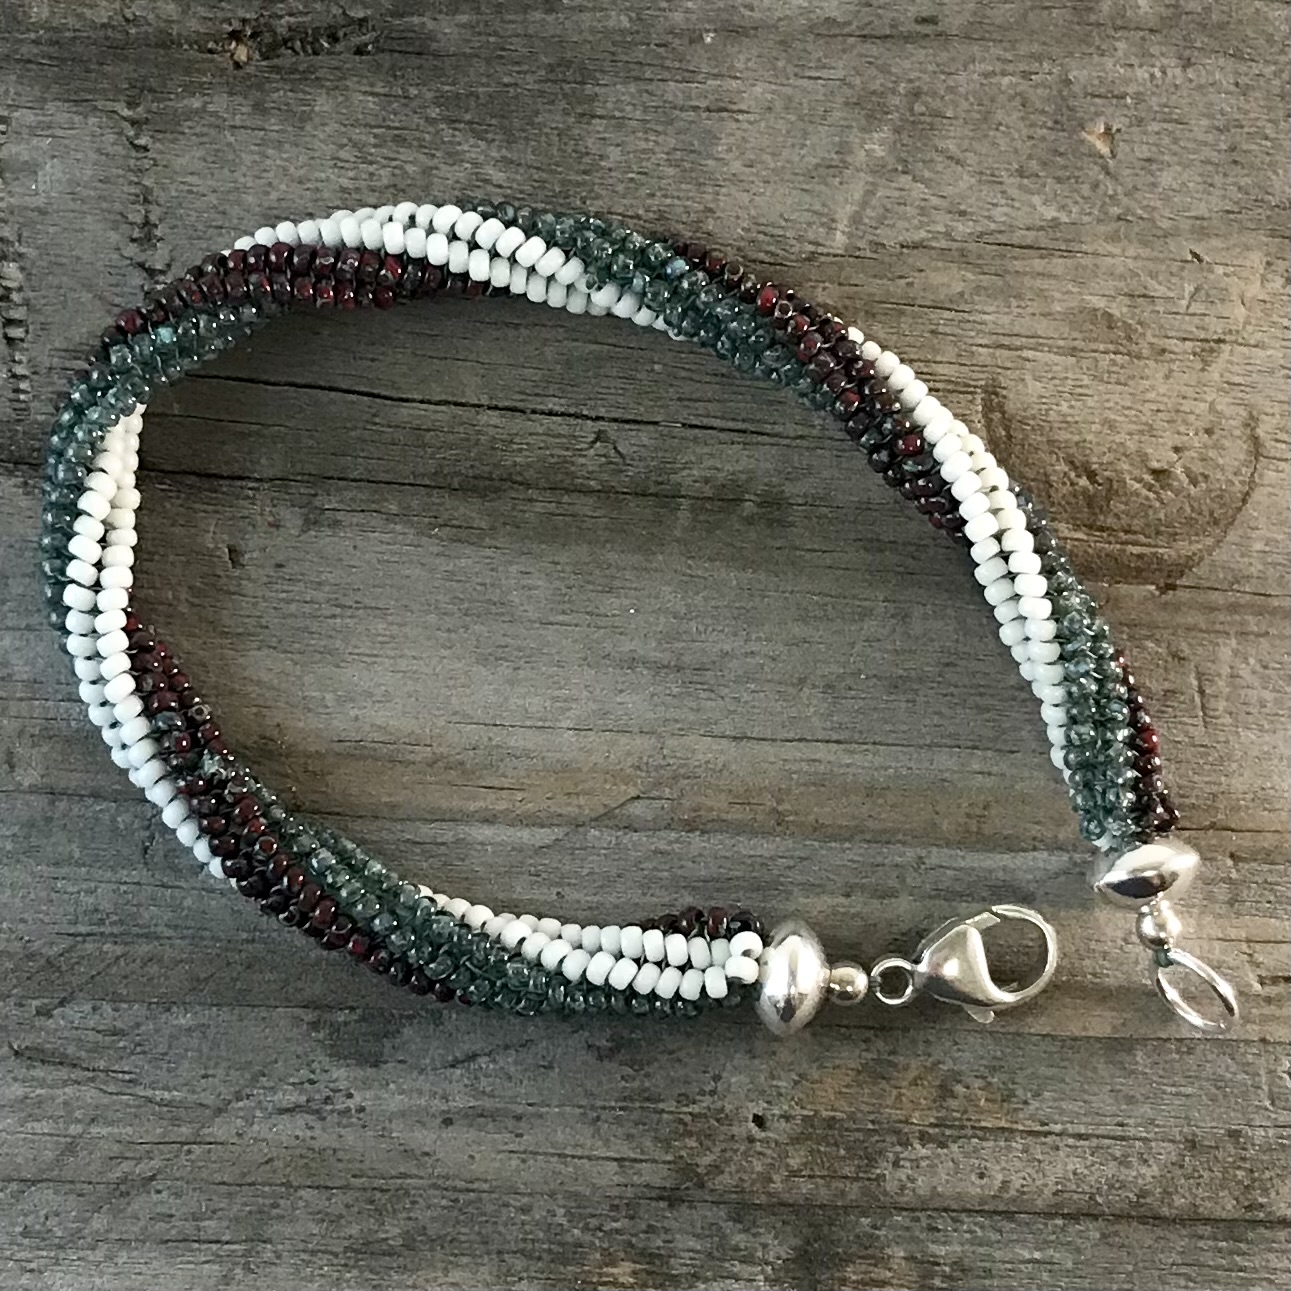
A different take on the basic tubular Ndebele (Herringbone) chain! Grab your favorite seed bead colors and learn this simple twisted weave!
Note: All materials and tools for classes must be purchased at Beadoholique Bead Shop. This allows us to continue providing you with quality classes.
Materials Needed: Size 11 seed beads (3 colors) 2 count of 6-8mm round or rondelle beads (for ends) 2 count of 2-3mm beads with holes large enough to pass through several times FireLine .006” (6lb test)
Tools Needed: Size 11 beading needles Beading awl Thread cutters Thread burner or lighter Bead board or mat Magnifiers/readers are highly recommended for a successful class experience (even if you wear contacts or glasses)!
Techniques Used: Ndebele
Skill Level: Beginner
Prerequisite: None
Instructor: Cindy
Three ways to sign up: Click here Send me an email Give me a call at 832-674-9005
Please Read:
1. Classes will begin on time! All students must arrive early for class. Even if you have already purchased supplies for the class, it takes time for everyone to set up and settle in. Students arriving late will need to re-schedule. Please be respectful of others by arriving early for class.
2. All beads, materials, and tools are available for purchase at the bead shop. We appreciate you purchasing materials and tools at the bead shop so that we may continue offering you the best classes around.
Join me for this advanced loom class where you’ll learn more new techniques: add a center row of beads that aren’t loomed in, learn a new method for tapering the ends, and more. Have fun adding gemstones or other beads to the center row and surround them with yummy seed bead colors!
Note: All materials and tools for classes must be purchased at Beadoholique Bead Shop. This allows us to continue providing you with quality classes.
Materials Needed: Seed beads size 11 (3-4 colors) 60+/- of: 2x3mm rondelles or 3mm beads or 2x3mm firepolish micro spacers One button or lobster, toggle One-G thread (warps and weft)
Tools Needed: Beading Loom (not warp-less) Size 12 beading needles (2 count) Beading awl Chain nose plier Fine tip tweezers Warp separator (must have) Fiber cutters/beading scissors Masking tape, Ultimate Glue Bead board or mat Ruler or measuring tape Magnifiers/readers are highly recommended for a successful class experience (even if you wear contacts or glasses)!
Techniques Used: Loom
Skill Level: Advanced
Prerequisite: Basic bead looming classes
Instructor: Lisa
Three ways to sign up: Click here Send me an email Give me a call at 832-674-9005
Please Read:
1. Classes will begin on time! All students must arrive early for class. Even if you have already purchased supplies for the class, it takes time for everyone to set up and settle in. Students arriving late will need to re-schedule. Please be respectful of others by arriving early for class.
2. All beads, materials, and tools are available for purchase at the bead shop. We appreciate you purchasing materials and tools at the bead shop so that we may continue offering you the best classes around.
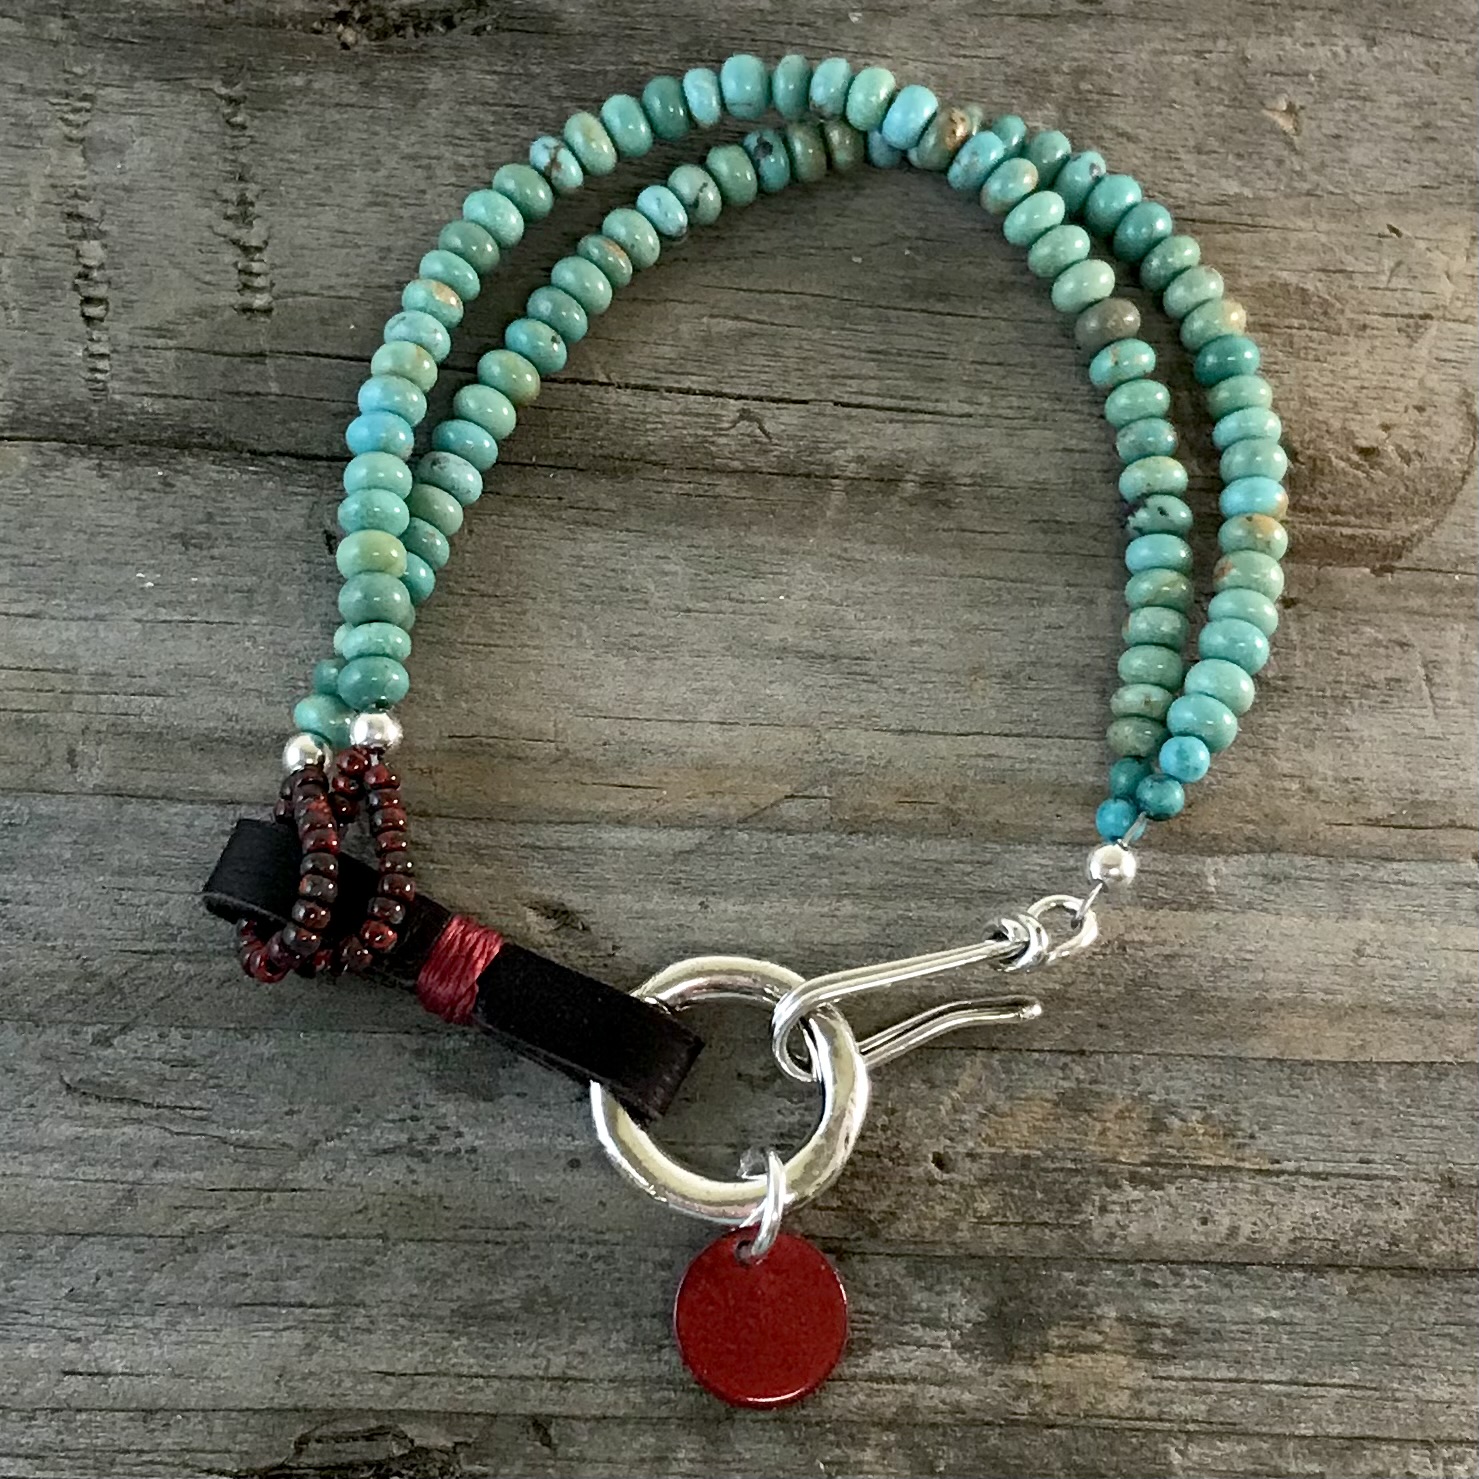
Stringing beads with a twist! Create a pretty double stranded bracelet, using deerskin leather as an accent, along with metal connectors and clasp. If you like, add a charm or two! Alternative design is bringing two strands of coordinating beads to one strand of large hole beads on leather. So many possibilities!
Note: All materials and tools for classes must be purchased at Beadoholique Bead Shop. This allows us to continue providing you with quality classes.
Materials Needed: Gemstone or glass beads Size 11 seed beads Large hole beads (optional) 2mmx2mm crimp beads Crimp covers Softflex Fine (.014″) Clasp (hook, lobster, toggle, etc.) Charm (optional) Deerskin leather (connector) Contrast thread to use with deerskin 1.5mm or 2mm round leather (optional) 18g, 6mm open jump rings
Tools Needed: Chain nose pliers 4-in-1 crimping tool Size 10 beading needle Fiber cutters Bead board or mat Magnifiers/readers are highly recommended for a successful class experience!
Techniques Used: Bead stringing, crimping
Skill Level: Beginner
Prerequisite: None
Instructor: Lisa
Three ways to sign up: Click here Send me an email Give me a call at 832-674-9005
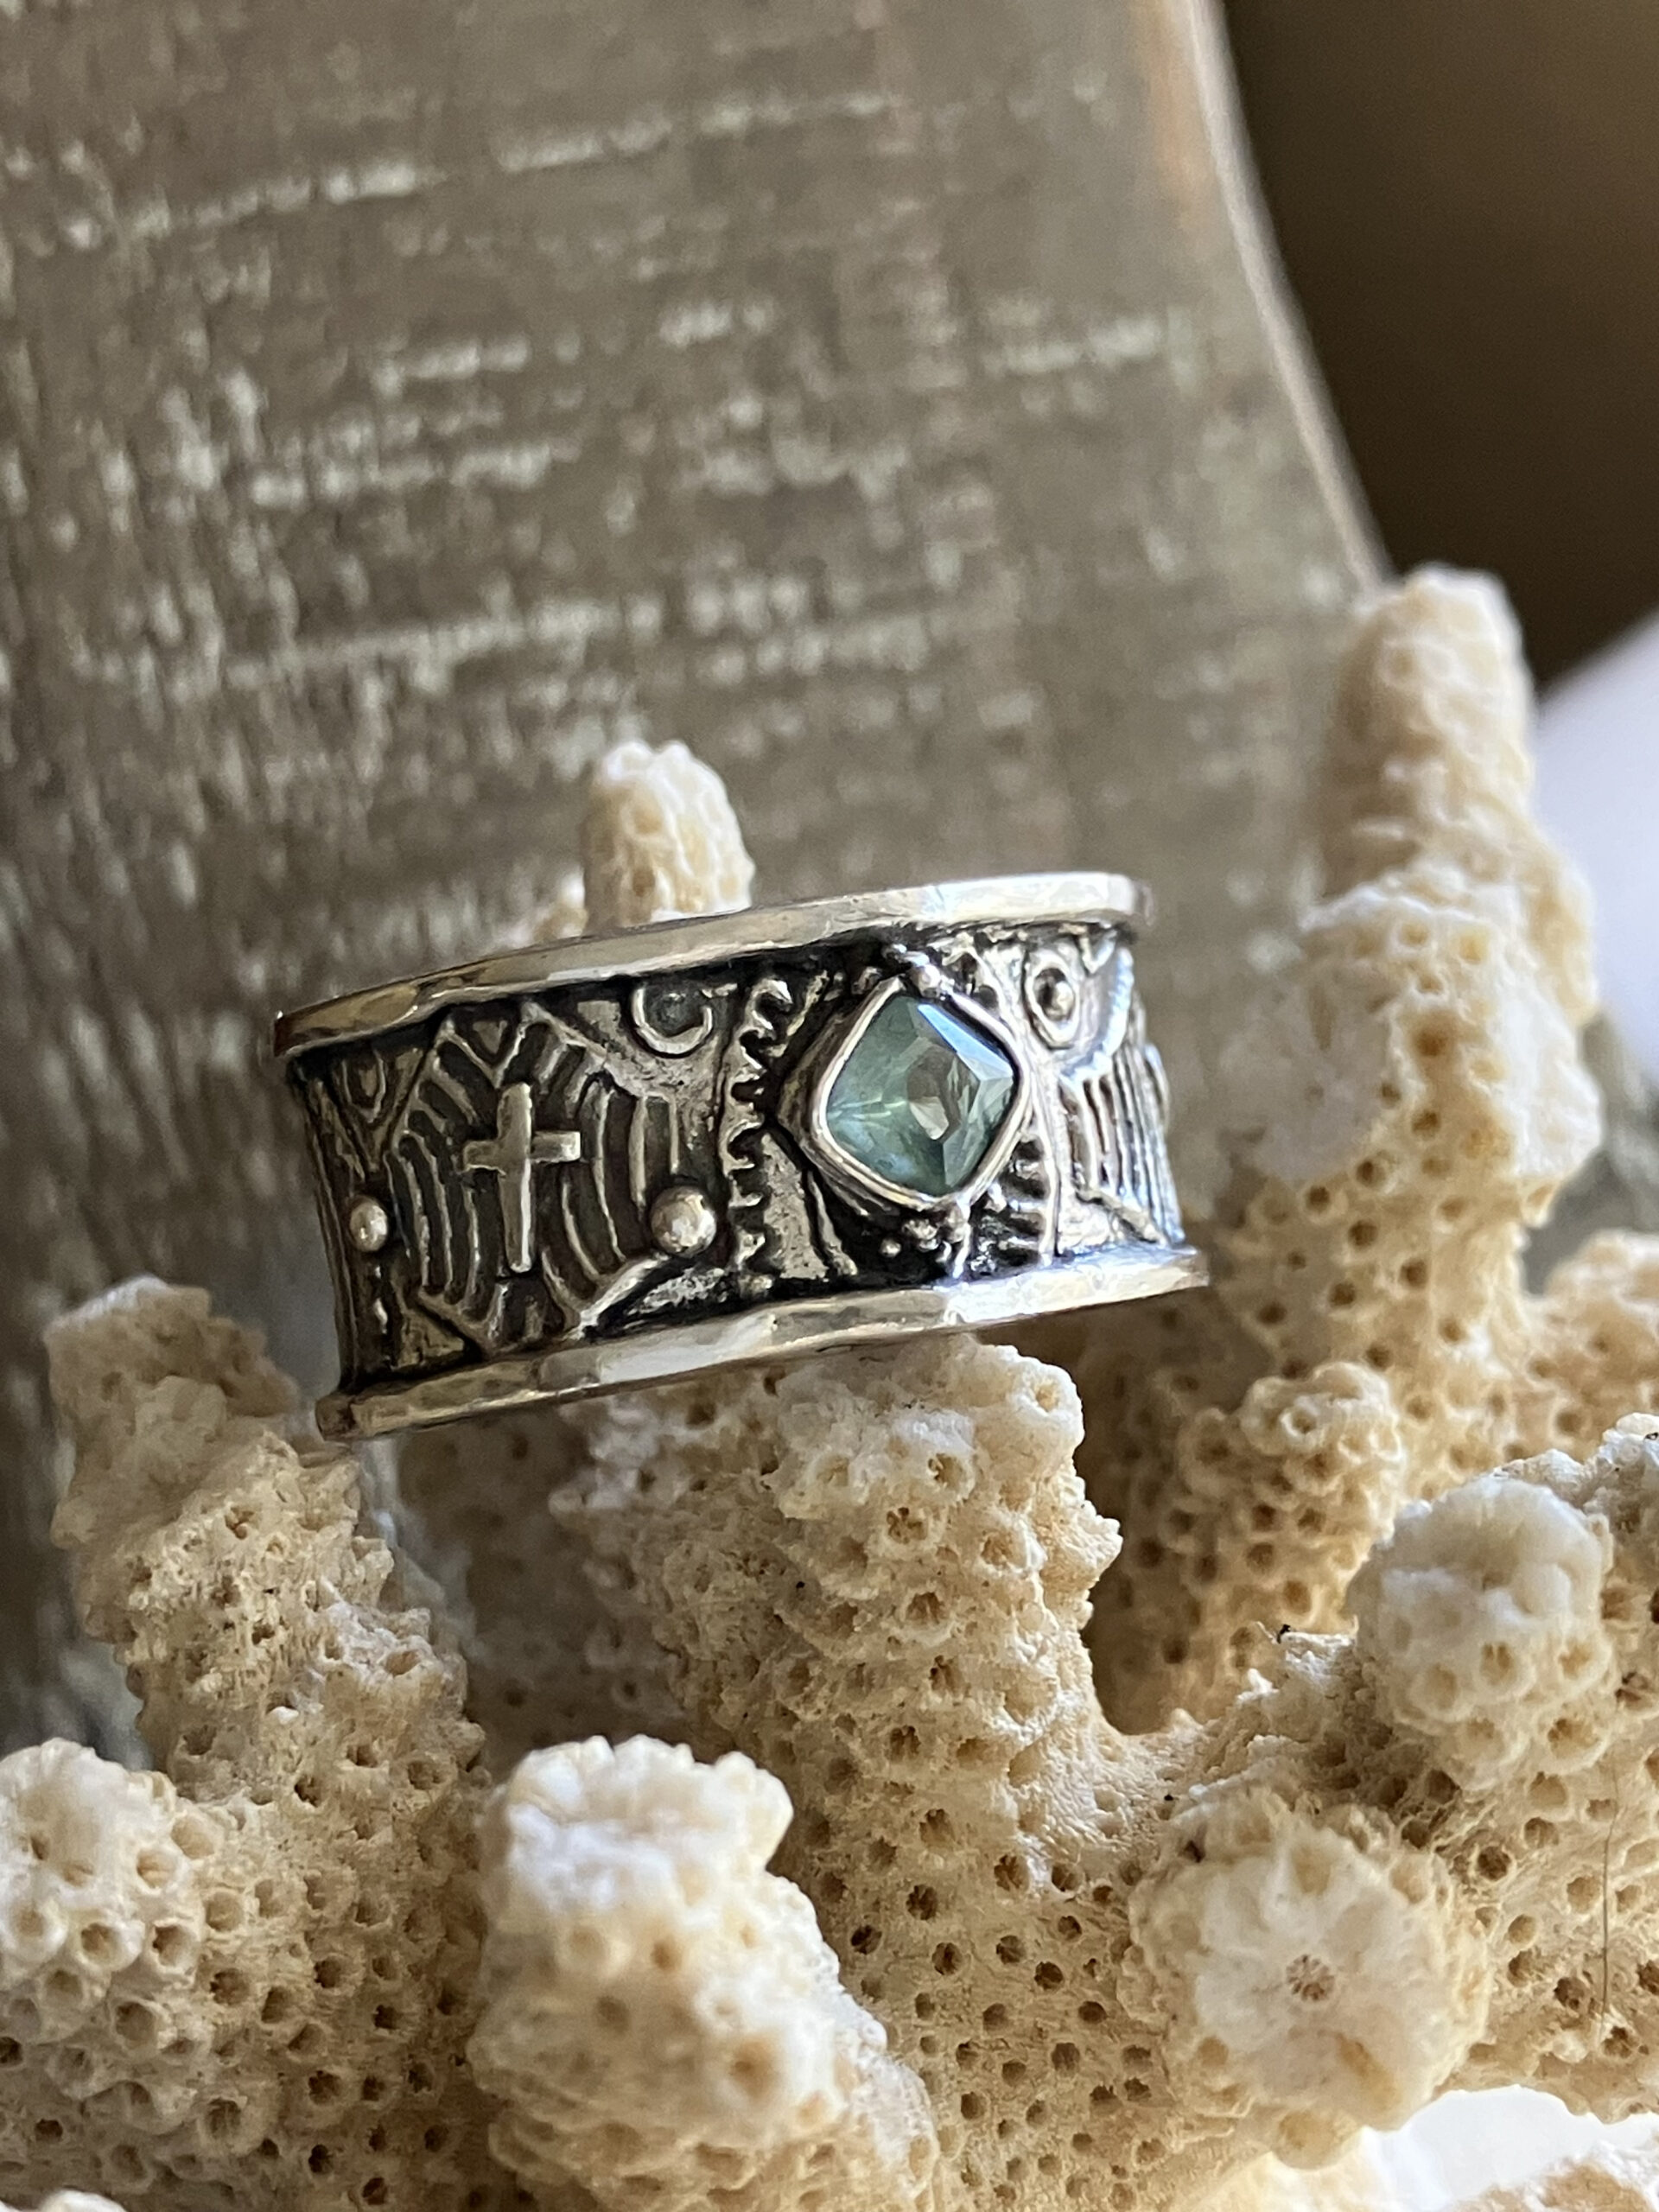
This beautiful ring features a larger fired-in stone presented in a syringe bezel setting. An intensely oxidized texture presents the stone as a major feature of this piece. All this is framed between two silvery rims that not only pop the stone and texture but confirm the ring’s rustic character.
You will learn how to size a metal clay ring, accounting for shrinkage, utilize previously learned techniques for application to forming rings, and use joining techniques that best control the typical stresses rings endure in everyday wear. Of course, making the usual artistic decisions concerning the elements of art — line, shape/form, color, texture, value, and space — and some principles of design such as emphasis and unity, happily cannot be avoided!
Metal clay rings must be made larger so that they can shrink to the correct size. For advanced metal clay artists, the single large stone can be swapped out for a stunning grouping of 3-4 smaller stones. Your choice! Come join the fun!
Please Read: The class fee shown above does not include the metal clay. You will be charged for the metal clay the day of the class. All materials and tools for classes must be purchased at Beadoholique Bead Shop. This allows us to continue providing you with quality classes.
Supplies & Tools Needed: ▸ Art Clay 950 silver clay (available day of class) ▸ Syringe clay (to make bezel setting(s)) ▸ Clay and Syringe keepers ▸ Clay slip, thick. If yours is watery, let it sit open and/or add some clay shavings to it so it thickens. Please prepare this before class so any chunks will be dissolved. You can make slip by crushing dried pieces of 950 clay and adding water. Store in a small container so it can meld together, and store in a hydrator with your clay. ▸ CZs/Nano gems: One large any cut, OR 3-4 smaller, preferably same cut, or an appealing combo of related shapes. ▸ One texture plate that will create a contrast to brighter polished silver areas (busy pattern with little negative space, as shown in the example) ▸ Ring mandrel. This can be a normal ring mandrel but will need a stand (feet) so that it will have working space below it so the mandrel can be turned for working the ring. You can also press the mandrel into 2 separate lumps of polymer clay, then bake these “feet” to easily make a stand. CoolTools.us sells a large assortment of mandrels and stands in a wide range of pricing. ▸ Hatti’s ring shank guide (available at the bead shop) ▸ Ring sizers (provided if you don’t have a set yet – CoolTools.us sells them ready made or you can buy the forms and investment to make your own) ▸ Waterproof paper strips (provided) ▸ Clear tape ▸ Ruler ▸ Tissue blade ▸ Xacto knife ▸▸▸ All metal clay-working tools, including thickness frames and rollers, snake roller, work surface, cup warmer, distilled water and accompanying tools, Cool Slip, Silk, etc., all clay joining tools (clay shapers, etc.), and all clay finishing tools, etc. ▸ Magnifiers/readers are highly recommended for a successful class experience (even if you wear contacts or glasses)!
Techniques Used: Metal clay
Skill Level: Advanced
Prerequisite: Experience with metal clay (multiple metal clay classes)
Instructor: Shauna
Three ways to sign up: Click here Send me an email Give me a call at 832-674-9005
Please Read:
1. Classes will begin on time! All students must arrive early for class. Even if you have already purchased supplies for the class, it takes time for everyone to set up and settle in. Students arriving late will need to re-schedule. Please be respectful of others by arriving early for class.
2. All beads, materials, and tools are available for purchase at the bead shop. We appreciate you purchasing materials and tools at the bead shop so that we may continue offering you the best classes around.